
Quick start
How to install a ZEROALERT server, connect the client to it and get your first view of server health in about 10 minutes.
How it works
ZEROALERT has two parts. The server is a lightweight Windows service installed on every monitored computer: it collects load, disk, service, 1C and Hyper-V data and serves it. The client is the program on your workstation: it connects to all servers, shows their state and sends alerts.
administrator workstation
TLS, port 19999
service on every monitored computer
The link is encrypted (TLS) and protected by the login and password you set when installing the server.
What you need
1. Install the server
Run the installer on the computer you want to monitor and choose the installation type:
- “Server only (service on this computer)” — for an ordinary monitored server;
- “Client and server” — if you will also view the data on this very computer;
- “Client only (workstation)” — for your own PC, see step 3.
On the settings page set a login and password (at least 12 characters, letters and digits), the port (default 19999) and, if you wish, the list of allowed client IP addresses. The “Allow control” box enables restart, service management and updates from the client.
server_fingerprint.txt in the server folder.2. Port 19999: firewall, router, reverse connection
The client connects to the server on TCP port 19999 (or the port you chose during installation). The port must be open on the server itself and along the whole path from your workstation to the server.
A. Windows Firewall on the server: the program opens the port itself
When the server is installed, the installer creates the Windows Firewall rule “ZEROALERT Server” by itself: inbound, TCP, the service port (if you chose another port, the rule is created for that port). You do not need to open the port manually; the rule is removed together with the program.
To check that the rule is in place, run this on the server in PowerShell as administrator:
Get-NetFirewallRule -DisplayName "ZEROALERT Server" | Get-NetFirewallPortFilter
The output should show Protocol : TCP and LocalPort : 19999.
If the rule is missing
This happens if the rule was deleted by hand, the port was changed later, or inbound connections are blocked by a third-party firewall or antivirus. Create the rule yourself in any of these ways (as administrator):
- PowerShell:
New-NetFirewallRule -DisplayName "ZEROALERT Server" -Direction Inbound -Protocol TCP -LocalPort 19999 -Action Allow
- Command prompt:
netsh advfirewall firewall add rule name="ZEROALERT Server" dir=in action=allow protocol=TCP localport=19999
- With the mouse: press Win+R, type
wf.msc→ “Inbound Rules” → “New Rule…” → “Port” → TCP, “Specific local ports”:19999→ “Allow the connection” → tick the profiles you need (Domain, Private, Public) → name it “ZEROALERT Server”.
If you use a third-party firewall or an antivirus with its own firewall, allow inbound TCP port 19999 for the ZEROALERTServer service there.
Let only your own computers in
The rule created by the installer opens the port to any address. To let only your workstations connect, do one of the following (or both):
- on the account page during installation (or later in
server_config.json, parameterallowed_ips) list the client addresses or subnets, for example192.168.1.0/24; - narrow the Windows Firewall rule as shown below.
Command prompt on the server (as administrator) — allow connections only from the subnet 192.168.1.0/24:
netsh advfirewall firewall set rule name="ZEROALERT Server" new remoteip=192.168.1.0/24
Check from your workstation
On the computer with the client run this in PowerShell (use your server address):
Test-NetConnection 192.168.1.10 -Port 19999
TcpTestSucceeded : True means the port is reachable. False means the path is blocked: the server firewall, a router between the networks, or the ZEROALERT service is not running.
B. The server is behind a router or firewall (for example MikroTik)
If the workstation and the server are on the same local network, there is nothing to configure on the router. If the client connects from another network (a branch, home, the Internet) and the server is behind a router, you need to forward the port from the router’s external address to the server’s internal address. The example below is for MikroTik (RouterOS 6 and 7); the addresses are made up, use your own: 192.168.88.10 is the server’s internal address (better to reserve it for the server permanently), 203.0.113.25 is the workstation’s external address.
B1. The forwarding rule (dst-nat). In WinBox: IP → Firewall → NAT → “+”. On the General tab: Chain = dstnat, Protocol = tcp, Dst. Port = 19999, In. Interface List = WAN (or In. Interface = your external interface, for example ether1). On the Action tab: Action = dst-nat, To Addresses = 192.168.88.10, To Ports = 19999. The same in the terminal:
/ip firewall nat add chain=dstnat action=dst-nat protocol=tcp dst-port=19999 in-interface-list=WAN to-addresses=192.168.88.10 to-ports=19999 comment="ZEROALERT server"
B2. Allow it in the forward chain. The default MikroTik configuration already lets forwarded connections through (the “drop all from WAN not DSTNATed” rule), so no extra rule is needed. If you have your own rules and inbound traffic from WAN is blocked, add an accept rule and put it above the drop rules (IP → Firewall → Filter Rules):
/ip firewall filter add chain=forward action=accept protocol=tcp dst-port=19999 dst-address=192.168.88.10 in-interface-list=WAN place-before=0 comment="ZEROALERT server"
B3. Restrict the source. Do not leave the port open to the whole Internet: add src-address=203.0.113.25 to both rules (on the General tab it is the Src. Address field; for several addresses use an address list, src-address-list). Even more reliable is not forwarding the port at all but connecting to the network through a VPN (WireGuard, IPsec or L2TP on the same MikroTik) and using the server’s internal address.
B4. A different external port (optional). If 19999 is taken on the outside or you want to hide it, change the external port, for example dst-port=29999, keeping to-ports=19999. Then enter 29999 in the client’s “Port” field.
B5. Client settings and check. In the client enter the router’s external IP address or DNS name in the “Address” field and the external port in the “Port” field. It is best to test reachability from another network (for example from a computer on mobile Internet):
Test-NetConnection 203.0.113.1 -Port 19999
On the router, under IP → Firewall → NAT, the packet counter (Bytes/Packets) of your rule should grow when the client connects.
On other routers and firewalls (Keenetic, pfSense, Ubiquiti, Fortinet and so on) the principle is the same: forward TCP port 19999 from the external address to the server’s internal address and allow it in the filtering rules.
If the server has no public address or forwarding the port is impossible, use the reverse connection (section C).
C. Reverse connection: the server connects to the client
If the server has no public address (the provider gives one address to many customers), someone else controls the router, or forwarding the port is impossible, reverse the direction: the server connects to the client itself on outbound TCP port 19998 and keeps the link. No inbound port is needed on the server: it is enough that the server can reach the address of your workstation over TCP. Everything else works as usual: TLS encryption, login and password, the same data and commands.
behind NAT, inbound connections closed
outbound TCP 19998
accepts reverse connections
| Direct connection (A, B) | Reverse connection (C) | |
|---|---|---|
| Who connects | the client to the server | the server to the client |
| Port | 19999 on the server | 19998 on the workstation |
| What to open | the server firewall and, if needed, the server-side router | the workstation firewall and, if needed, the router where the client is |
| Server address in the client | IP address or DNS name of the server | the word reverse |
| When it fits | the server is reachable over the network or you can forward a port to it | a server behind NAT with no forwarding; many branches whose router is not yours |
C1. Turn on accepting reverse connections in the client. Open Settings → the “Веб, узел, обновления” tab (Web, hub, updates), tick “Принимать обратные подключения серверов (NAT)” (accept reverse server connections), leave the port at 19998, save and restart the client (these settings take effect after a restart). Then allow the inbound port in Windows Firewall on this computer (command prompt as administrator):
netsh advfirewall firewall add rule name="ZEROALERT reverse" dir=in action=allow protocol=TCP localport=19998
If the client is behind a router, forward port 19998 to the computer with the client, as in section B. For MikroTik (192.168.1.50 is the address of the computer with the client):
/ip firewall nat add chain=dstnat action=dst-nat protocol=tcp dst-port=19998 in-interface-list=WAN to-addresses=192.168.1.50 to-ports=19998 comment="ZEROALERT reverse"
Add src-address= with the branch router’s external address if it is constant: then only your server can see the port.
C2. Configure the server. On the server open server_config.json as administrator, in the server folder (next to ZEROALERTServer.exe), and add two parameters: agent_name — the server’s name for the client — and reverse — the list of clients it connects to. Leave the other parameters alone. A shortened example (your file has more parameters):
{
  "port": 19999,
  "users": { "admin": "invent-a-password-of-12-or-more-characters" },
  "agent_name": "Filial1",
  "reverse": [
    { "host": "office.example.com", "port": 19998 }
  ]
}agent_name— a unique server name; preferably Latin letters and digits, without the|character. You will enter the same name in the client in C3.host— the address of the workstation with the client: an IP address or DNS name (for forwarding, the external address of the office router).port— the port from C1 (19998 by default).- Passwords may be written in plain text: they are hashed automatically when the service starts. Logging in with the default password “secret” is forbidden.
If the server must connect to several clients (for example the administrator’s main and standby computers), add several entries; each may have its own name (name):
  "agent_name": "Filial1",
  "reverse": [
    { "host": "office.example.com", "port": 19998 },
    { "host": "203.0.113.25", "port": 19998, "name": "Filial1-reserve" }
]server.log and re-reads the file every 30 seconds. You can check the file before starting in PowerShell from the server folder (no output means the file is valid):Get-Content .\server_config.json -Raw | ConvertFrom-Json | Out-Null
Restart the service (command prompt as administrator, from the server folder):
ZEROALERTServer.exe restart
A few seconds later server.log shows a connection line. To view the log:
Get-Content .\server.log -Tail 20
Look for a line like “Обратное подключение к office.example.com:19998 установлено (имя «Filial1»)” (the server log is in Russian).
C3. Add the server in the client. “Servers → Add server…” and fill in the fields:
| Field | What to enter |
|---|---|
| Name | Exactly what agent_name says on the server (letter case does not matter) |
| Address | The word reverse (this tells the client the server will connect by itself) |
| Port | The server service port, 19999 by default |
| Login and password | From the users parameter in server_config.json |
| Fingerprint | From server_fingerprint.txt on the server — for reverse-connection servers enter it right away |
The same as one line, if you keep the server list in the client’s serv.txt file: Filial1|reverse|19999|admin|password|fingerprint.
C4. Check. The server appears in the list within a minute (the server retries every 5–15 seconds, the client waits up to 90 seconds for the connection) and shows data like any other.
| What you see | Cause and what to do |
|---|---|
No “установлено” (established) line in server.log | The server cannot reach the client. From the server check: Test-NetConnection office.example.com -Port 19998. Check the firewall rule on the client computer, port forwarding on the router, and that the client was restarted after enabling the option. |
| The client log says the name is not in the server list (address reverse) and the connection is rejected | The name in the client does not match agent_name, or the “Address” field is not reverse. |
| The server shows “Offline” with “server did not connect (reverse connection)” | The server did not connect within 90 seconds: see the first row; make sure “Принимать обратные подключения серверов (NAT)” is ticked. |
| “Certificate does not match” or waiting for confirmation | Enter the value from server_fingerprint.txt in the Fingerprint field (option A in step 5). |
| The service does not start after editing the file | A JSON error: the reason is written to server.log; fix the file and the service re-reads it by itself. |
All parameters are described in the “Инструкция сервера.txt” file (server instructions, in Russian) in the program folder; if anything does not work, write to support.
3. Install the client
On your workstation run the same installer and choose “Client only (workstation)”. After installation open ZEROALERT from the desktop. The server list is empty at first — we add the first server in the next step.
4. Add the server
In the client choose Servers → Add server… and fill in the fields:
| Field | What to enter |
|---|---|
| Name | Any clear name, for example MSK-DC01 |
| Address | IP address or DNS name of the server |
| Port | The one set during installation (default 19999) |
| Login and password | The account created in step 1 |
| Fingerprint (optional) | From server_fingerprint.txt on the server. If empty, you confirm the certificate after the first connection (step 5) |
| MAC (optional) | To wake a powered-off computer over the network |
| Group (optional) | For example “Moscow office” — for convenience and notification filters |
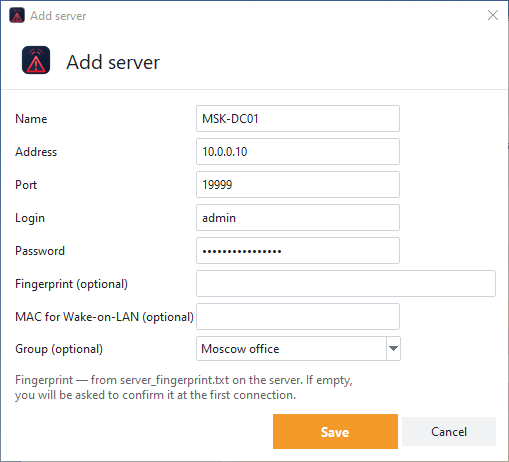
Click Save. If a fingerprint is given, the client connects at once and shows the data. If the field is empty, go to step 5.
5. Confirm the certificate
During installation the ZEROALERT server creates its own TLS certificate. So that your password never goes to a “foreign” computer that happens to answer at the same address, the client does not send the password until you confirm the certificate fingerprint — 64 hexadecimal characters (SHA-256). You do this once per server. There are two ways.
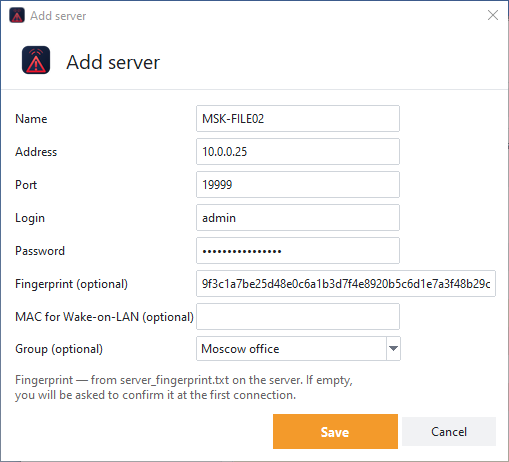
Option A. Enter the fingerprint when adding the server (faster)
- On the server itself open
server_fingerprint.txtin the ZEROALERT program folder. Or runZEROALERTServer.exe fingerprintin a command prompt on the server — it prints the fingerprint. - Copy the last line of the file — 64 characters.
- Paste it into the Fingerprint field of the “Add server” dialog and click Save. The client connects immediately.
Option B. Confirm after the first connection
If you left the Fingerprint field empty, the server appears in the list as Offline: the client saw the certificate but did not send the password.
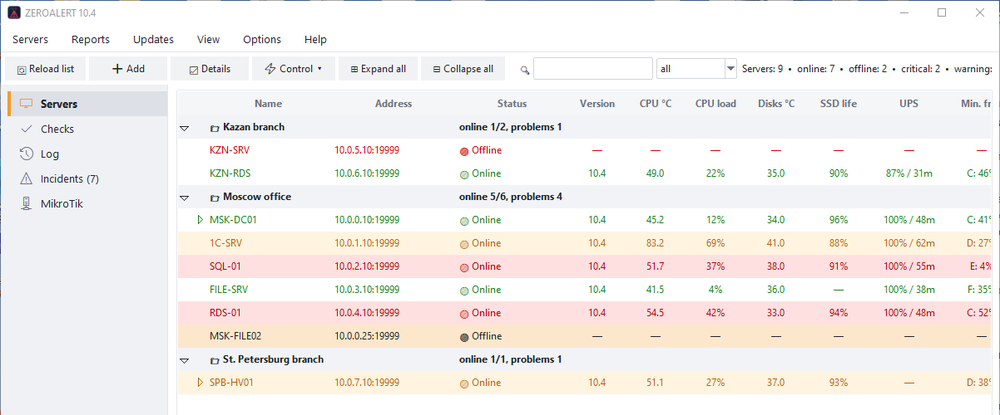
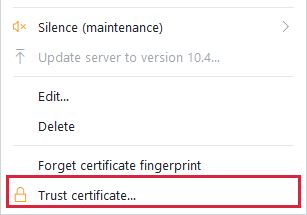
- Right-click the server and choose Trust certificate… — the item at the very bottom of the menu.
- A window shows the fingerprint presented by the server. Compare it with
server_fingerprint.txton the server (at least the beginning, the end and a few characters in the middle). If it matches, click Yes.
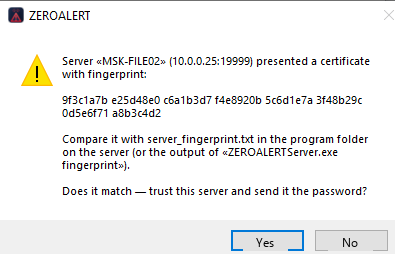
The client remembers the fingerprint and connects: the password goes only to the verified server.
6. Check
The main window now shows the server row: CPU load, memory, disks, uptime. Green means all is well; yellow and red mean thresholds are exceeded.
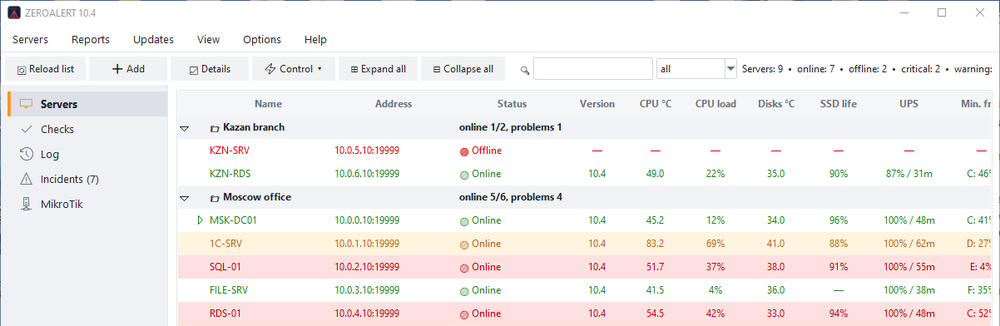
Double-click a server to open its detail card: charts, disks, services, events, 1C, Hyper-V. Repeat steps 4–5 for each server.
7. Thresholds and notifications
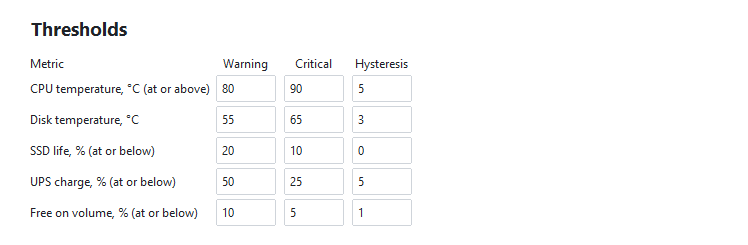
In Settings → Thresholds set the levels at which the program treats a situation as “warning” and “critical”: CPU temperature, disk temperature, SSD life, UPS charge, free space on volumes. Sensible defaults are already set.
To receive alerts on your phone, connect a notification channel:
- Telegram setup — a bot with the “Take it” button (free);
- e-mail, VK, SMS and voice call — in the corresponding Settings tabs.
8. Licence
For the first 30 days all Business features are available. After that the program keeps working for free — up to 3 servers. The licence state is shown in Settings → License.
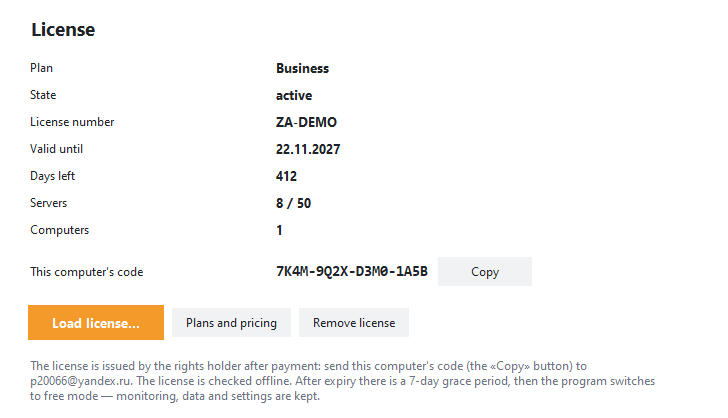
Details and prices are on the Pricing page.
9. Troubleshooting
| Symptom | Cause | What to do |
|---|---|---|
| Wrong login or password | The data differs from what was set when installing the server. | Check keyboard layout and case; to change the password, reconfigure or reinstall the server. |
| “Certificate does not match” | The server was reinstalled and has a new certificate. | In the client: Servers → Forget certificate fingerprint of selected, then connect again. |
| No connection / timeout | The port is blocked by a firewall or the service is not running. | Check the ZEROALERT service on the server and port 19999 reachability from your workstation (step 2: Windows Firewall and port forwarding on the router). |
| Server connected but no data | The first poll is in progress. | Wait 1–2 minutes. |
Still stuck? Write to us from the Support page.